
Requests
Build a request, send it and read the response: methods, params, headers, body, auth and history.
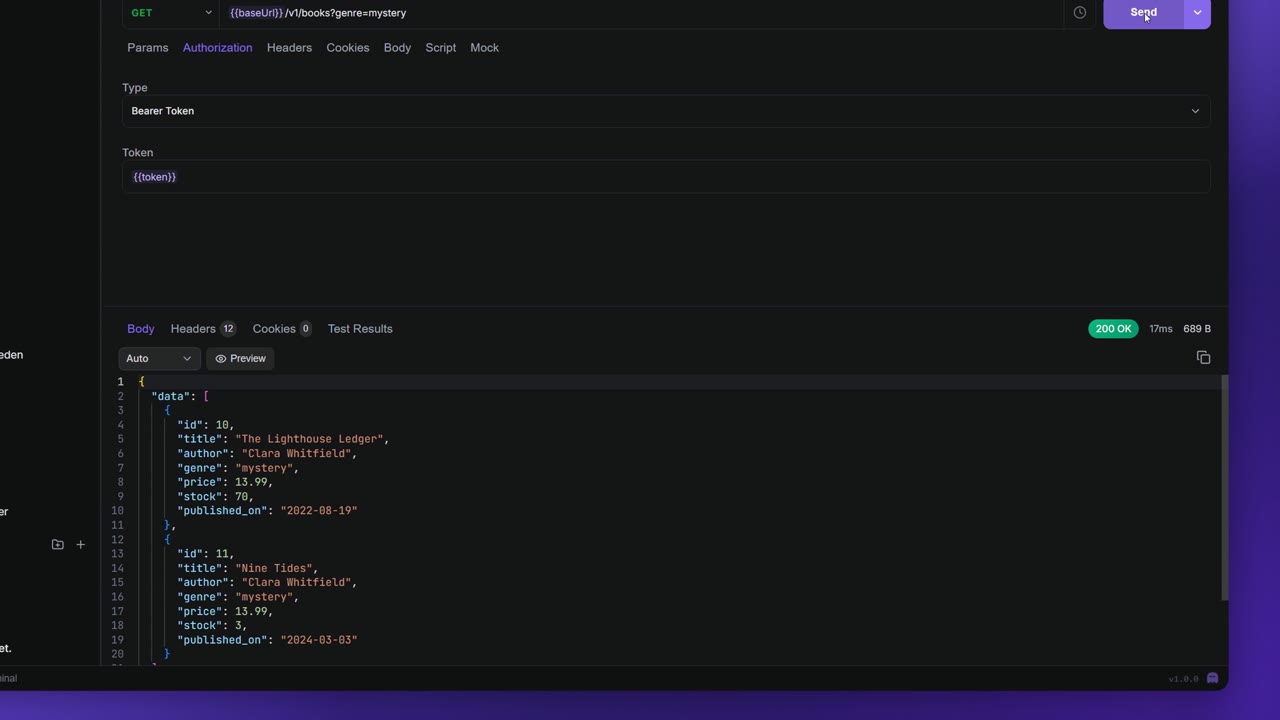
A request is one call to an API: a method, a URL, and whatever goes with it (params, headers, cookies, a body and authorization). This page walks through building one, sending it, reading the response, and keeping it in a collection. The examples use the Bookshop demo API at http://localhost:4180/v1.
Create a request
Click + at the end of the tab strip. A menu asks which kind of request you want:
| Kind | What you get |
|---|---|
| HTTP | A plain HTTP request. |
| GraphQL | An HTTP request already set to POST, with the GraphQL body and a Content-Type: application/json header. |
| WebSocket | A WebSocket connection. See WebSocket. |
| Server-Sent Events | An SSE stream. See Server-Sent Events. |
| gRPC | A gRPC call. See gRPC. |
There are shortcuts to the same place:
- Ctrl+T (⌘+T on macOS) opens a new HTTP tab straight away.
- Right-click a tab and choose New Tab.
- In the sidebar, right-click a collection or folder and choose Add, then Request or another kind. The request is created inside that folder.
On the tab, an HTTP request shows its method in colour; the other kinds show their protocol's icon.
Method and URL
Pick the method from the list next to the URL: GET, POST, PUT, PATCH, DELETE, HEAD or OPTIONS.
Then type the URL, for example http://localhost:4180/v1/books. While you type:
{{suggests your variables, such as{{baseUrl}}/books. See Variables & environments.- A query string you type, like
?author=Marchetti&limit=10, fills the Params tab, and editing the Params tab rewrites the URL. - Pasting a whole cURL command into the URL field fills in the method, URL, headers, params, cookies and body for you.
Params, headers and cookies
Params, Headers and Cookies are tables of key and value pairs:
- Tick or untick a row's checkbox to include or skip it without deleting it.
- There is always an empty row at the bottom. Typing a key into it adds the next one.
- Hover a row and click the bin icon (Remove) to delete it.
- Tab moves between Key and Value, row by row.
Apiboo sends a User-Agent: Apiboo/1.0 header with every request. It is shown as a locked first row on the Headers tab. Add your own User-Agent header to send a different one.
Cookies you add on the Cookies tab are sent together as one Cookie header. Apiboo does not keep a cookie jar between requests, so a cookie a server sets is not sent back automatically on your next request; add it on the Cookies tab instead. (The collection runner is the exception, see Run a collection.)
Body
The Body tab has a type picker:
| Type | Use it for |
|---|---|
| None | Requests without a body. |
| Raw | Text, JSON or XML that you type. Pick Text, JSON or XML in the second picker, and Apiboo sets the matching Content-Type. |
| Form-data | A multipart/form-data form. Each row is Text or File; a file row has a Select file button. |
| URL Encoded | An application/x-www-form-urlencoded form of text fields. |
| GraphQL | A Query and its Variables, with an optional schema explorer. See GraphQL. |
Switch on Settings → Editor → Auto-format JSON on send to have raw JSON bodies pretty-printed before they're sent.
Authorization
The Authorization tab sets how the request proves who you are. Pick a Type:
| Type | Fields |
|---|---|
| Inherit from parent | None. The request uses the auth of its collection. This is the default. |
| No Auth | None. |
| Bearer Token | Token. Sent as Authorization: Bearer …. |
| API Key | Key and Value, and Add to: Header or Query params. |
| Basic Auth | Username and Password. |
| OAuth 2.0 | A Grant type and its fields (see below). |
| AWS Signature v4 | Access Key ID, Secret Access Key, an optional Session Token, AWS Region (default us-east-1) and Service (default execute-api). |
The token, key, value, username and password fields accept variables, so a token can live in {{accessToken}}.
OAuth 2.0
OAuth 2.0 has three grant types:
- Paste access token: paste a token you already have into Access token.
- Authorization Code + PKCE: fill in Authorization URL, Token URL, Client ID, Client secret and Scope, then click Get New Access Token. Your browser opens so you can sign in. This grant needs the desktop app.
- Client credentials: fill in Token URL, Client ID, Client secret and Scope, then click Get New Access Token.
Once Apiboo has a token, it shows it masked with its expiry. Clear token throws it away. When you send with an expired token, Apiboo renews it first: with the refresh token if the server gave one, or, for Client credentials, by fetching a new token. If that fails, a Token not renewed notice appears and the request goes out with the old token.
Inherit from the collection
With Inherit from parent, the tab tells you which collection the auth comes from. Set the auth once on the collection (see Collection settings) and every request in it that inherits uses it. Pick another type on a request to override it for that request only.
Send the request
Click Send, or press Ctrl+Enter (⌘+Enter). That shortcut works from anywhere in the request, including the body and script editors. Enter in the URL field sends too.
While Apiboo waits, the response area shows Awaiting response with the elapsed time and a Cancel button.
The arrow next to Send opens Send options, which has Download: it sends the request again and saves that response to a file.
Read the response
Above the response you see the status (for example 200 OK), the time in milliseconds and the size. Hover the size to see how it splits into headers and body, for both the response and the request.
When a request fails with a status of 400 or more, an Explain button asks the AI assistant what went wrong (see AI assistant).
The response has four tabs:
| Tab | Shows |
|---|---|
| Body | The response body. |
| Headers | Every response header, with the count and total size. |
| Cookies | The cookies the server set: Name, Value, Path, Expires and flags such as HttpOnly, Secure and SameSite. |
| Test Results | The results of your post-response tests, for example "3 / 3 passed". See Read the test results. |
The Body tab has a small toolbar:
- Format: Auto, JSON, XML, HTML, JavaScript, CSS, YAML or Text. Auto picks one from the response.
- Preview: renders HTML in a safe frame, shows JSON as a table, and shows images and PDFs as they are.
- Hex: a hex view, offered for binary responses.
- The copy icon (Copy response body) copies the body.
Pick which view opens first in Settings → Editor → Default response view: Pretty, Raw or Preview.
If the request couldn't reach the server at all, you see Request failed and a Retry button.
Save a request
Click Save or press Ctrl+S (⌘+S). A request that is already in a collection is saved in place. A new one opens the Save request dialog:
- Enter a Request name. An unnamed request takes its name from the URL.
- Under Destination, pick a collection or folder. Search collections and folders… narrows the list, and New folder or New collection creates one on the spot.
- Click Save here.
Rename, duplicate and delete
| Action | How |
|---|---|
| Rename | Click the name above the URL, type, and press Enter (Esc cancels). Or press F2 or Ctrl+E, or right-click it in the sidebar and choose Rename. |
| Duplicate | Press Ctrl+D for the saved request in the active tab, or right-click it in the sidebar and choose Duplicate. |
| Delete | Right-click it in the sidebar and choose Delete, then confirm. This can't be undone. |
Work with tabs
Each open request is a tab. A dot instead of the × means the tab has unsaved changes.
Right-click a tab for New Tab, Duplicate Tab, Close Others, Close Tab and Close All Tabs. Duplicate Tab opens an unsaved copy next to the original.
The arrow at the end of the strip (All tabs) lists every open tab with a search box, and Close all closes them all and opens a fresh request. Drag tabs to reorder them.
History
Every request you send is recorded, including the ones that failed. Apiboo keeps the last 100.
History on the rail lists them by day (Today, Yesterday, then the date). Each row shows the method, URL and time.
- Search history… filters by URL and method.
- Click a row to open it again. It fills the current tab if that tab is empty, otherwise it opens a new one.
- Clear History removes everything, after you confirm.
Each request also has its own history. Click the clock button next to the URL to list the earlier runs of this request, with their status, time and when they ran. Click an older run to look at its response; a chip next to the request name takes you back to the current one.
Generate code
To turn a saved request into code, right-click it in the sidebar and choose Generate Code. Pick a language:
| Language | Library |
|---|---|
| cURL | Shell |
| Python | Requests |
| TypeScript | Fetch |
| Go | net/http |
| Java | HttpClient |
| C# | HttpClient |
| PHP | cURL |
| Ruby | Net::HTTP |
| Swift | URLSession |
Copy copies the snippet. Options has settings per language (for cURL, for example, multiline, short flags, follow redirects, silent mode, quote style and a timeout) and an Include auth switch.
Proxy and certificates
To send requests through a proxy, open Settings → Proxy:
- Switch on Enable Proxy.
- Pick the Proxy Type: HTTP, HTTPS, SOCKS5 or System Proxy.
- Enter the Host and Port, and a Username and Password if the proxy needs them. The password is kept only for the current session.
- List hosts that should skip the proxy under Bypass, separated by commas. The default is
localhost,127.0.0.1. - Click Test Connection to check it.
Client certificates, your own CA certificates and Disable SSL Verification globally (for local servers with self-signed certificates) are in Settings → Certificates.
Shortcuts
| Shortcut | Action |
|---|---|
| Ctrl+T | New HTTP tab |
| Ctrl+Enter | Send |
| Enter in the URL | Send |
| Ctrl+S | Save |
| F2 or Ctrl+E | Rename |
| Ctrl+D | Duplicate the saved request |
On macOS, use ⌘ instead of Ctrl. Change them in Settings → Keyboard; Send and Save can't be remapped.